![]()
![]() PhysBeans Creating Applets with PhysBeans First Example Applets Polar
representation of complex numbers
PhysBeans Creating Applets with PhysBeans First Example Applets Polar
representation of complex numbers
![]()
![]()
Now that the graphical user interface is ready, the applet should do something. This happens when one or more beans send messages to other beans as a consequence of certain events. Such events are triggered by the user (a click on a button, an <ENTER> in a text field), by the program (at the program start or timer related) or by other beans (as messages). If a bean receives a message, it can react by changing its internal state or maybe by sending own messages to other beans.
In a JavaBeans environment one implements such behaviour by connecting two beans and defining the corresponding message. Using the Connection Wizard in NetBeans this task is reduced mainly - sometimes completely - to graphical operations with the mouse. Sometimes it is still necessary - or just simpler - to define the message content explicitely by adding a few lines of Java code manually.
In the case of our example applet the message flow is very simple:
To create the connection between the NumericTextLine for x and the Cart2PolarFunction proceed with the following steps:
This creates all Java code that is necessary for the message passing. Most of it is guarded code, namely the addition of a listener that waits for events coming from numericTextLine1:
and the function called by the listener
that makes the actual work. Only the body of this function - the message proper - is not guarded and can be adjusted manually.
After the wizard is finished NetBeans switches to the source view and jumps directly to the generated message
Even with little knowledge of Java one can understand its meaning:
Take the value of numericTextLine1 and use it to define the property x of cart2PolarFunction1.
This is exactly what was intended, therefore no manually change of the generated code is necessary.
Now switch back to the design view and create the second message, from numericTextLine2 to cart2PolarFunction1, in exactly the same way using the following parameters:
Similarly enter the message from cart2PolarFunction1 to numericTextLine3 using
And finally the last one from cart2PolarFunction1 to numericTextLine4:
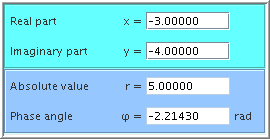
This finishes the construction of the applet. To see whether everything is ok, just run it (as usual with Run/Run File or Shift-F6). NetBeans is aware of the code change since the last compilation and first compiles automatically, before it starts the applet. If you enter the test values -3.0 and -4.0 (and confirm both with <ENTER> !), you should see the following:
1 This happens because the autoTriggered property of the Cart2PolarFunction has the (default) value true.
![]()
![]()