![]()
![]() PhysBeans Creating Applets with PhysBeans First Example Applets Polar
representation of complex numbers
PhysBeans Creating Applets with PhysBeans First Example Applets Polar
representation of complex numbers
![]()
![]()
The right hand side of the NetBeans window contains three areas:
If the Palette window is hidden by the Navigator window, bring it to the front by clicking on its tab. It now displays the four categories of beans in the PhysBeans library:
Several additional categories contain Java standard components (Swing, AWT) or are reserved for self-made beans (Beans). We won't need them in the following.
Select the categorie PBInOut by clicking on its name. Make sure
the forms editor is in Selection mode: Is the corresponding icon
(![]() ) above the forms window highlighted? If
so: fine! If not: click on it.
) above the forms window highlighted? If
so: fine! If not: click on it.
Now look for the bean NumericTextLine in the palette, it is
represented by its icon ![]() . When you point at it with
the mouse, after a short moment a tool-tip window displays its name. Click
on the icon and move the mouse into the forms window. A simplified
graphical representation of the bean is attached to the mouse and an orange
frame shows where the bean will be inserted. Now click into the upper
(input) panel of the applet shown in cyan. The bean is now added to the
applet.
. When you point at it with
the mouse, after a short moment a tool-tip window displays its name. Click
on the icon and move the mouse into the forms window. A simplified
graphical representation of the bean is attached to the mouse and an orange
frame shows where the bean will be inserted. Now click into the upper
(input) panel of the applet shown in cyan. The bean is now added to the
applet.
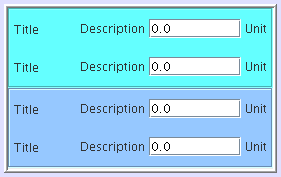
In the same way add another NumericTextLine to the input panel of the applet and two more to the output panel. The color of the beans is automatically adjusted to the color of the panel:
Now choose the category PBFunc from the Palette window
and select the bean Cart2PolarFunction (![]() ). Since it has no graphical representation in the applet, you can
click anywhere in the forms window to add it.
). Since it has no graphical representation in the applet, you can
click anywhere in the forms window to add it.
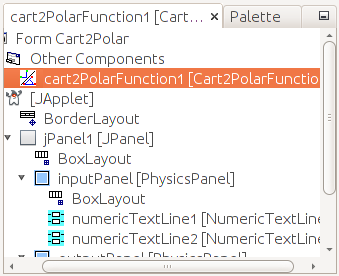
Next change from the Palette window to the Navigator window. Here you can see all beans of the applet, where some of them are already part of the template. The tree structure represents the graphical nesting of the components (a bean in another bean in a window bean etc.). With a click onto the small triangle you can hide a part of the tree or show it again. All beans that have no graphical representation are collected under Other Components .
If you have added a wrong bean, you can delete it by choosing Delete from its context menu, either in the inspector window or directly in the forms window. Don't forget to save the current state.
![]()
![]()